Captions and translation: display, modes and your own voice
Everything that changes what you see while captions are running: which language shows, how much of the screen the captions take up, how fast translations arrive, and whether your own voice is included.
Original, bilingual or translation
- 1Use the switch in the panel's top bar
Choose Original, Bilingual or Translation at any time during a session.
- 2Fine-tune Bilingual mode
In the panel's settings (gear icon), Text Order decides which language comes first. How the two languages are arranged is covered in the next section.
- 1Pick a display mode before you start
Display mode on the home screen sets whether you see the original, both languages, or the translation only.
- 2Change it during a session
In the floating captions window, the A button lets you switch display mode, line order, text size, colors and background opacity. In the main window, the A button opens Caption appearance for line order, text size, colors and the bilingual layout.
Bilingual layout: by sentence or by language
In Bilingual mode, Bilingual Layout decides how the two languages are arranged:
- By sentence: each original sentence is followed by its translation, so you read them in pairs. Good for checking a translation against what was actually said.
- By language: each language reads as its own block, so you can follow one language without the other breaking in.
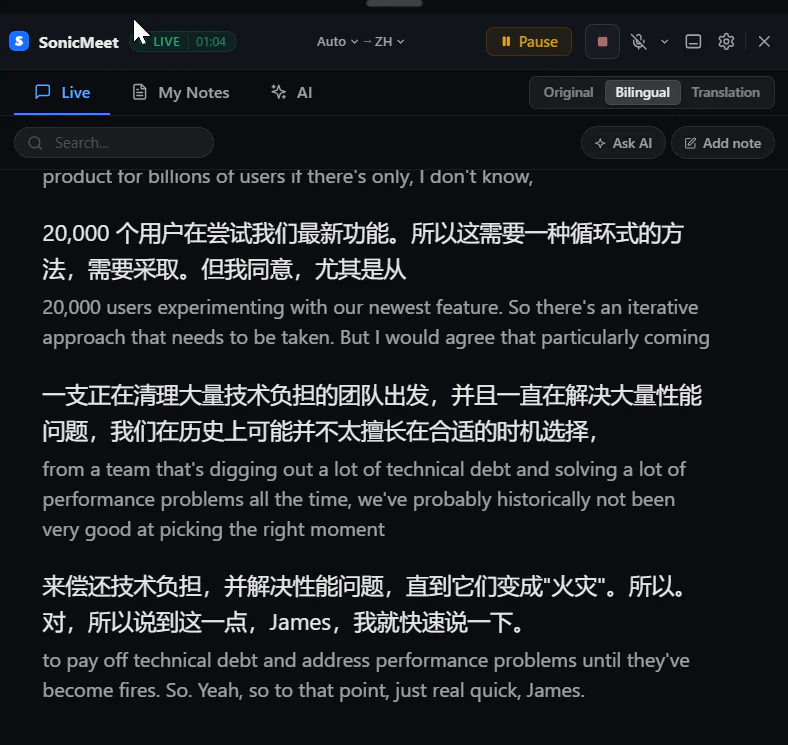
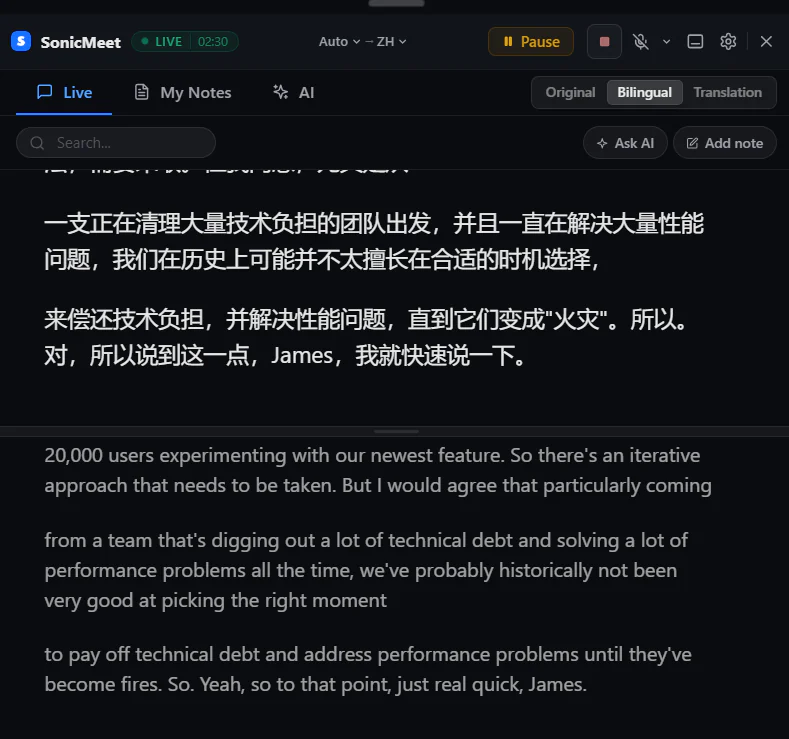
Where to set it: in the extension, the gear icon in the caption panel → Bilingual Layout; in the desktop app, the A button → Caption appearance → Bilingual Layout. It only appears in Bilingual mode.
Compact Mode in the extension and desktop app
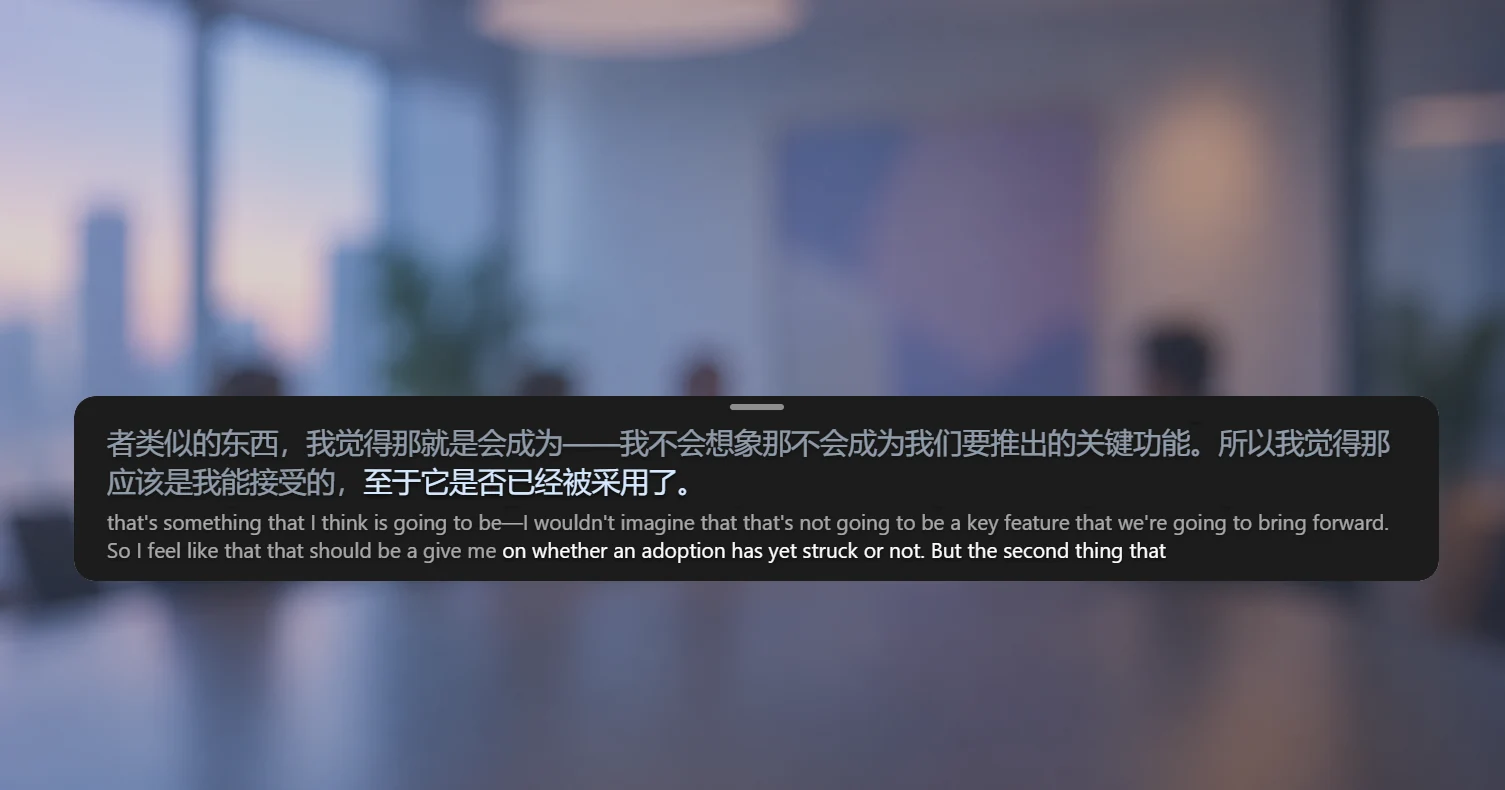
The extension's Compact caption bar and the desktop app's Floating captions use the same compact, subtitle-style display shown below. The extension places it on the meeting page; the desktop app keeps it above other apps. Point at the bar to show its controls. The image shows the caption display, without those controls.
- 1Click Compact caption bar
It's the icon just left of the settings gear in the caption panel's top bar. The panel turns into a bar near the bottom of the page, above the meeting's own controls, with up to two lines per language.
- 2Point at the bar for its controls
Pause or Resume, the square button to finish and save, your microphone, and Settings (the sliders icon) to switch between Original, Bilingual and Translation or change the text size. ✕ stops captions and closes the bar.
- 3Move it, resize it, or switch back
Drag the bar anywhere on the page, and drag its left or right edge to change the width; it stays where you put it next time. For notes, AI or any other setting, double-click the bar or click Expand to full panel.
- 1Click Floating
It's in the live bar. The main window steps aside and the captions move to a small window that stays on top of other apps, even full-screen ones. It also opens on its own when you minimize the main window during a session, or start a session while the main window is hidden.
- 2Point at it for its controls
Pause or Resume, Finish & save (the square button), your microphone, and A for Caption appearance: what to show, line order, text size and color for each language, and background opacity.
- 3Move or resize it
Drag the short bar at the top of the window to move it, and drag an edge or a bottom corner to resize it. It first opens at the bottom of your screen, and after that where you left it.
- 4Bring the main window back
Open app (the arrows icon at the end of the controls) opens the main window, and the floating window steps aside: the two never show at the same time. The tray menu also has Show captions and Hide captions.
- In the extension, the panel and the bar go full screen along with the meeting or a video, so captions stay visible.
- When a session ends, the extension switches back to the full panel so you can see what was saved. The next session opens in the bar again.
- When you finish in the desktop app, the floating window offers View session to open the session you just saved.
Instant or Accurate translation
| Instant | Accurate | |
|---|---|---|
| Delay | Minimal (sub-second delay) | Usually about 1–5 seconds more than Instant |
| How it works | Translates each phrase as it arrives | Waits for fuller sentences and uses more of the surrounding context |
| Best for | Fast back-and-forth conversation | Technical discussions, long explanations, anything where accuracy matters more than speed |
- 1Open the panel's settings
Click the gear icon in the caption panel's top bar.
- 2Choose Instant or Accurate
Under Translation mode. The option only appears while translation is on.
- 1Before a session
Settings → Translation mode, then Instant or Accurate.
- 2During a session
Click the language pair in the live bar, change the mode, and click Apply. This isn't available while the session is paused.
Pick the right languages
- Auto Detect handles meetings that switch between languages. If the speakers mostly use one language, choosing it yourself gives more accurate captions.
- You can change languages without stopping: click the language pair in the extension panel's top bar, or in the desktop app's live bar.
- In the extension, if the source and target are the same language, SonicMeet shows captions only, without translation.
- In the extension, when SonicMeet detects Chinese it offers to switch to Cantonese or to Traditional Chinese captions if that's what you need.
Include your own voice
SonicMeet captions what the meeting plays, and that doesn't include your own microphone. Turn the microphone on when you want your words in the captions and the transcript too.
- 1Click the microphone icon in the panel's top bar
The first time, SonicMeet opens a page where Chrome asks for microphone access. Choose Allow while visiting the site.
- 2Use a different microphone (optional)
Gear icon → Microphone source, then pick the microphone or audio interface.
- 1Click the microphone button in the live bar
It's off by default and available once a session is running. SonicMeet remembers your choice for the next session. On a Mac, macOS asks for microphone access the first time.
- 2Use a different microphone (optional)
Click the arrow next to the microphone button, or set a default in Settings → Microphone.
Text size, theme and layout
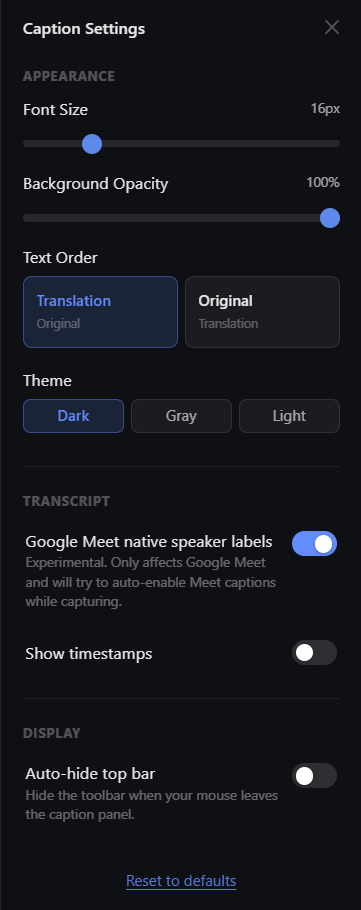
| Browser extension | Desktop app | |
|---|---|---|
| Where | Gear icon in the panel → Caption Settings | The A button → Caption appearance (and the floating window's own A button) |
| Text | Font size | Text size and colors |
| Background | Background opacity and theme (Dark, Gray, Light) | Background opacity of the floating window |
| Layout | Text Order, Bilingual Layout, Auto-hide top bar, Show timestamps | Line order and bilingual layout |
To make the captions take up less room, see Compact Mode in the extension and desktop app.
Common questions
Why don't my own words appear in the captions?
SonicMeet captions the meeting audio, which doesn't include your microphone. Turn on the microphone in the extension's caption panel or in the desktop app's live bar to add your voice.
Does Accurate mode cost more?
No. Instant and Accurate use the same minutes, and neither uses AI credits. Accurate is only slower, usually by about 1 to 5 seconds.
Can I get captions without translation?
Yes. Turn off Enable translation before you start, and SonicMeet shows captions in the language being spoken.
Can I make the captions cover less of the meeting?
Yes. In the extension, click Compact caption bar in the caption panel's top bar: the panel shrinks to a subtitle-style bar you can move and resize. In the desktop app, click Floating in the live bar for a small window that stays on top of other apps.
Do captions stay visible in full screen?
Yes. In the extension, the caption panel or bar goes full screen along with the meeting or video. The desktop app's floating captions stay on top of other apps, including full-screen ones.